

It’s 6:30 PM on a Wednesday. You’re staring at that package of chicken in your fridge—again—and trying to muster enthusiasm for dinner. I’ve been there more times than I can count, standing in my tiny Portland kitchen, wondering how to turn the same protein into something that doesn’t feel like déjà vu.
Here’s what I’ve learned after years of weeknight cooking battles: easy chicken dishes for dinner don’t have to mean boring or flavorless. These seven recipes have saved countless Tuesday nights when I’m racing the clock and my cat Cilantro is trying to steal ingredients off the counter. They’re the easy chicken dishes for dinner I actually make when life gets chaotic—not the ones that look pretty but require seventeen specialty ingredients or leave you standing at the stove for an hour.
Why These Easy Chicken Dishes for Dinner Actually Work
Let me be honest—I used to think quick dinners meant sacrificing flavor or settling for something mediocre. Then I realized the problem wasn’t the time constraint; it was my approach. These recipes work because they’re built around real life: limited counter space, busy schedules, and the very real need to eat something that tastes good without spending your entire evening in the kitchen.
Each one uses ingredients you probably already have (or can grab without a special trip), comes together in 30 minutes or less, and—this is key—actually tastes like something you’d order out. Plus, most involve minimal cleanup, which honestly might be their best feature.
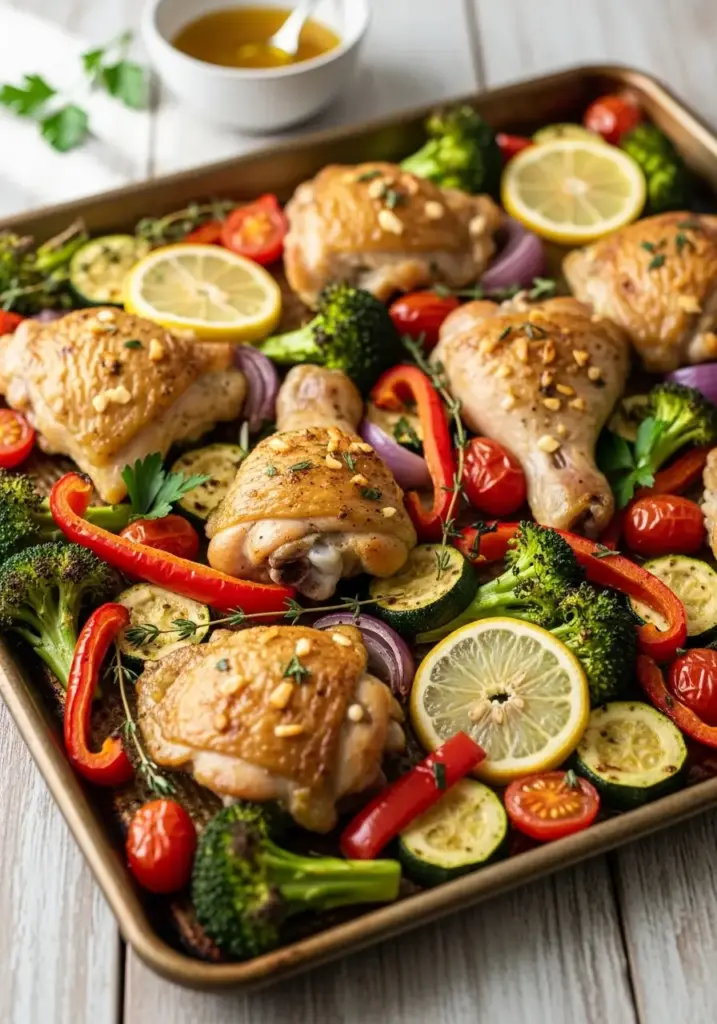
1. Sheet Pan Lemon Garlic Chicken and Vegetables
This is the recipe that taught me sheet pan dinners aren’t just a trendy concept—they’re genuinely life-changing. I discovered it during one of those weeks where everything felt overwhelming, and I needed dinner to basically cook itself.
The genius here is in the lemon-garlic marinade. While the oven does all the work, your kitchen fills with this incredible aroma that makes you feel like an actual competent adult who has their life together. And when my partner, Jamie, who’s usually skeptical of one-pan meals, asked for seconds? I knew I’d found a keeper.
Ingredients You’ll Need
- 4 boneless, skinless chicken breasts (about 1.5 lbs)
- 2 tablespoons olive oil, divided
- 3 cloves garlic, minced (or 6, if you’re me)
- 1 lemon, juiced and zested
- 1 teaspoon dried oregano
- 1 teaspoon dried thyme
- Salt and pepper to taste
- 1 lb baby potatoes, halved
- 2 cups broccoli florets
- 1 red bell pepper, chopped
- 1 medium red onion, cut into wedges
Ava’s swaps: Chicken thighs work beautifully here and honestly stay juicier. Swap broccoli for Brussels sprouts if that’s what you’ve got, and sweet potatoes instead of regular are amazing in fall.
Timing
- Prep: 10 minutes
- Cook: 25 minutes
- Total: 35 minutes
How to Make It
Step 1: Get that chicken marinating
Preheat your oven to 425°F. Mix 1 tablespoon olive oil with garlic, lemon juice, half the zest, oregano, and thyme in a small bowl. Place your chicken on one side of a large sheet pan and pour this golden goodness over it. Let it hang out while you prep the veggies.
Step 2: Prep your vegetables
Toss potatoes, broccoli, bell pepper, and onion with the remaining olive oil in a large bowl. Season with salt and pepper—don’t be shy here. Arrange them on the other side of the sheet pan in a single layer. Trust me, giving them space to breathe is what gets you those crispy, caramelized edges.
Step 3: Let the oven work its magic
Pop everything in the oven for 20-25 minutes. The chicken should hit 165°F internally, and those veggies should be tender with slightly charred edges. I rotate the pan halfway through for even browning, but I’ve also forgotten and it turned out fine.
Step 4: The finishing touch
Sprinkle with the remaining lemon zest and let it rest for 5 minutes. I learned this the hard way—cutting into chicken immediately turns your cutting board into a juice lake and leaves the meat dry.
Nutritional Info
Per serving: 320 calories | 35g protein | 18g carbs | 12g fat | 4g fiber
How I Serve It
Honestly, I just bring the whole sheet pan to the table. It’s rustic, it’s easy, and there’s one less dish to wash. Sometimes I’ll throw together a quick side salad with olive oil and lemon juice to keep the Mediterranean vibe going. If I’m feeling fancy (or have guests), a sprinkle of fresh parsley and some crumbled feta makes it look like you tried way harder than you did.
What Not to Do
Don’t overcrowd that pan. I know it’s tempting to fit everything on one sheet, but cramped vegetables steam instead of roast, and you’ll miss out on those delicious caramelized bits. Use two pans if you need to—future you will thank present you.
Also, cut your vegetables roughly the same size. I once threw in huge potato chunks with tiny broccoli florets, and it was a textural disaster—mushy broccoli with raw potatoes isn’t the vibe we’re going for.
Storage Tips
Leftovers keep in the fridge for up to 3 days. Reheat in the oven at 350°F for 10-15 minutes to maintain the texture—microwaving makes everything soggy, and nobody wants that. This also freezes well for up to 2 months if you’re into meal prep.
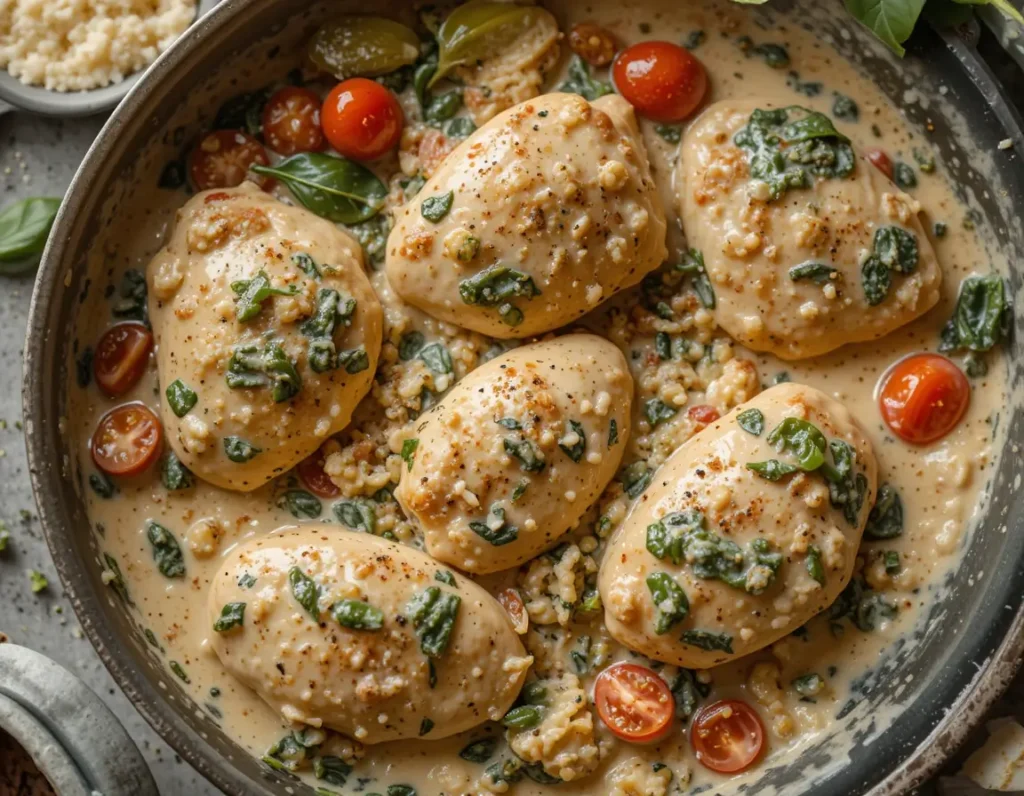
2. Creamy Tuscan Chicken Skillet
Last winter, after spending $65 on mediocre Italian takeout, I decided enough was enough. This dish was my answer to restaurant creamy chicken—and honestly? It’s better. The sauce is silky, garlicky, and comes together in minutes, and that moment when the spinach wilts into the golden cream is pure kitchen magic.
The first time I made it, Jamie stopped mid-bite and declared, “Never order this out again.” High praise from someone who’s eaten my cooking for years and witnessed plenty of kitchen fails.
Ingredients You’ll Need
- 4 boneless, skinless chicken thighs
- 2 tablespoons olive oil
- 3 cloves garlic, minced
- 1 cup cherry tomatoes, halved
- 2 cups fresh spinach
- 1 cup heavy cream
- 1/2 cup chicken broth
- 1/2 cup grated Parmesan cheese
- 1 teaspoon Italian seasoning
- Salt and pepper to taste
- Optional: 1/4 cup sun-dried tomatoes (highly recommended)
Ava’s swaps: Greek yogurt can replace heavy cream if you want something lighter. Kale works well instead of spinach—just give it a few extra minutes to wilt.
Timing
- Prep: 10 minutes
- Cook: 20 minutes
- Total: 30 minutes
How to Make It
Step 1: Get that golden crust
Season your chicken thighs with salt, pepper, and half the Italian seasoning. Heat olive oil in a large skillet over medium-high heat. Cook chicken 4-5 minutes per side until golden and cooked through (165°F). Remove and set aside—we’ll bring it back later.
Step 2: Build your sauce
In the same skillet (don’t you dare wash it—those brown bits are flavor gold), add garlic and cook for 30 seconds until fragrant. Toss in cherry tomatoes and cook 2-3 minutes until they start to burst. Add spinach and watch it wilt into basically nothing—it’s always shocking how much fresh spinach cooks down.
Step 3: Make it creamy
Pour in chicken broth and scrape up all those delicious browned bits from the bottom of the pan. Add heavy cream, remaining Italian seasoning, and Parmesan. Stir until the sauce thickens, about 3-4 minutes. Return chicken to the skillet, spoon sauce over the top, and simmer for 2-3 minutes.
Nutritional Info
Per serving: 410 calories | 28g protein | 7g carbs | 32g fat | 2g fiber
How I Serve It
This begs to be served over pasta—fettuccine or penne work beautifully. For a lower-carb option, zucchini noodles or cauliflower rice let the sauce shine. A side of garlic bread for soaking up every last drop is non-negotiable in my house.
What Not to Do
Don’t rush the sauce reduction. I know you’re hungry, but patience yields that silky texture we’re after. Also, cream-based sauces need more seasoning than you think—taste before serving and adjust.
And please, add the spinach at the very end. Overcooked spinach turns dark and sad, and we want it vibrant green.
Storage Tips
This keeps for 3 days in the fridge. When reheating, add a splash of chicken broth or milk to revive the sauce—it thickens considerably when cold. Reheat gently on the stovetop over medium-low heat, stirring occasionally.
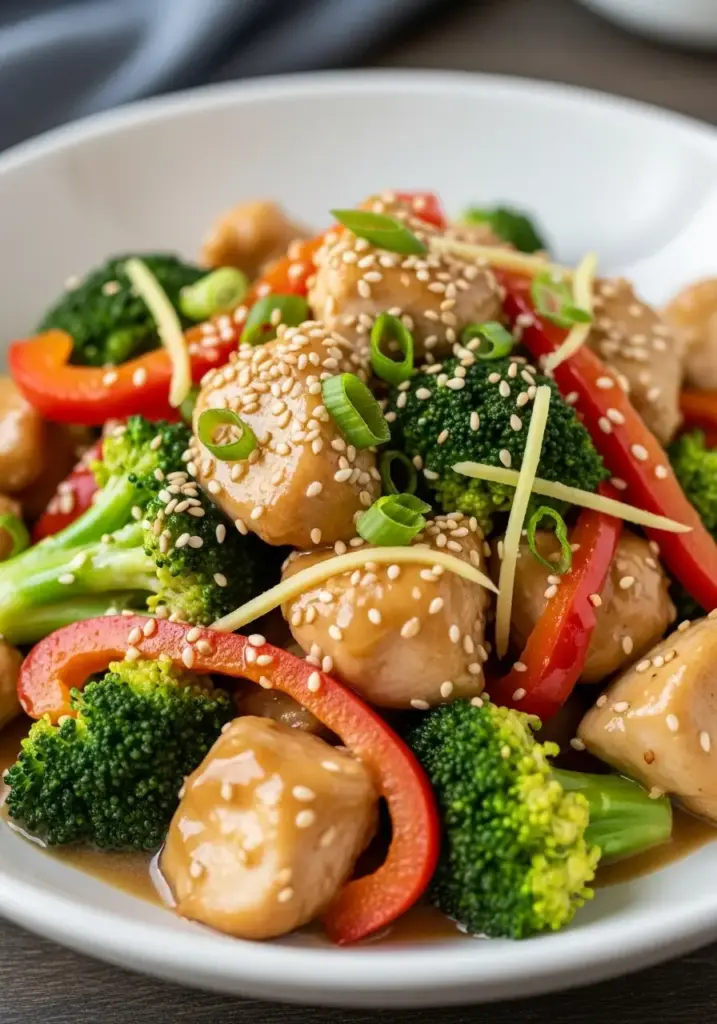
3. Honey Garlic Chicken Stir-Fry
This recipe was born from chaos. During a particularly insane week where our family calendar looked like a game of Tetris, our dinner window had shrunk to approximately 22 minutes. I needed something faster than fast, and this stir-fry saved us from the drive-through lane.
The sticky-sweet garlic sauce is so good, it made my usually phone-absorbed teenager look up and ask how I made it. Now it’s our Monday night staple—the night nobody has energy but everyone still needs real food.
Ingredients You’ll Need
- 1 lb boneless, skinless chicken breast, cut into bite-sized pieces
- 2 tablespoons vegetable oil
- 4 cloves garlic, minced
- 1 tablespoon fresh ginger, grated
- 1 red bell pepper, sliced
- 1 yellow bell pepper, sliced
- 2 cups broccoli florets
- 1 carrot, julienned
For the sauce:
- 1/4 cup honey
- 3 tablespoons soy sauce (low-sodium preferred)
- 1 tablespoon rice vinegar
- 1 tablespoon cornstarch
- 1/2 cup water
- 1/2 teaspoon red pepper flakes (optional, but I always add them)
Ava’s swaps: Brown sugar works instead of honey. Any vegetables you have work here—snap peas, mushrooms, or bok choy are all excellent.
Timing
- Prep: 15 minutes
- Cook: 12 minutes
- Total: 27 minutes
How to Make It
Step 1: Mix your sauce
Whisk together honey, soy sauce, rice vinegar, cornstarch, water, and red pepper flakes in a small bowl. Set aside.
Step 2: Cook the chicken
Heat 1 tablespoon oil in a large wok or skillet over high heat. Add chicken pieces and cook 4-5 minutes until browned and cooked through. Remove and set aside.
Step 3: Stir-fry those veggies
Add remaining oil to the same pan. Toss in garlic and ginger, stirring constantly for 30 seconds—you want fragrant, not burned. Add bell peppers, broccoli, and carrots. Stir-fry 3-4 minutes until crisp-tender. You want them still slightly crunchy.
Step 4: Bring it together
Return chicken to the pan. Pour the sauce over everything and cook, stirring frequently, for 2-3 minutes until the sauce thickens and coats everything with that glossy finish. The cornstarch activates with heat to create that perfect stir-fry texture.
Nutritional Info
Per serving: 290 calories | 26g protein | 25g carbs | 10g fat | 3g fiber
How I Serve It
Over steamed rice, brown rice, or quinoa to soak up the sauce. Cauliflower rice works for lower-carb needs. Garnish with sesame seeds and sliced green onions for a restaurant-quality finish. If you’re really hungry, a side of steamed edamame adds extra protein.
What Not to Do
Cold wok = sad stir-fry. Always preheat thoroughly. And don’t crowd the pan—cook in batches if needed to get proper browning instead of steaming.
Cut your chicken into uniform pieces. Inconsistent sizes mean some pieces are overcooked while others are underdone, and that’s frustrating.
Give the sauce a quick whisk before adding it to the pan. Cornstarch settles, and you’ll end up with clumpy sauce otherwise. I learned this the hard way.
Storage Tips
Keeps in the fridge for up to 4 days. Store rice separately from the chicken and vegetables for best texture. When reheating, add a tablespoon of water to prevent the sauce from getting too thick. This is also great for meal prep—prep everything ahead and store separately until ready to cook.
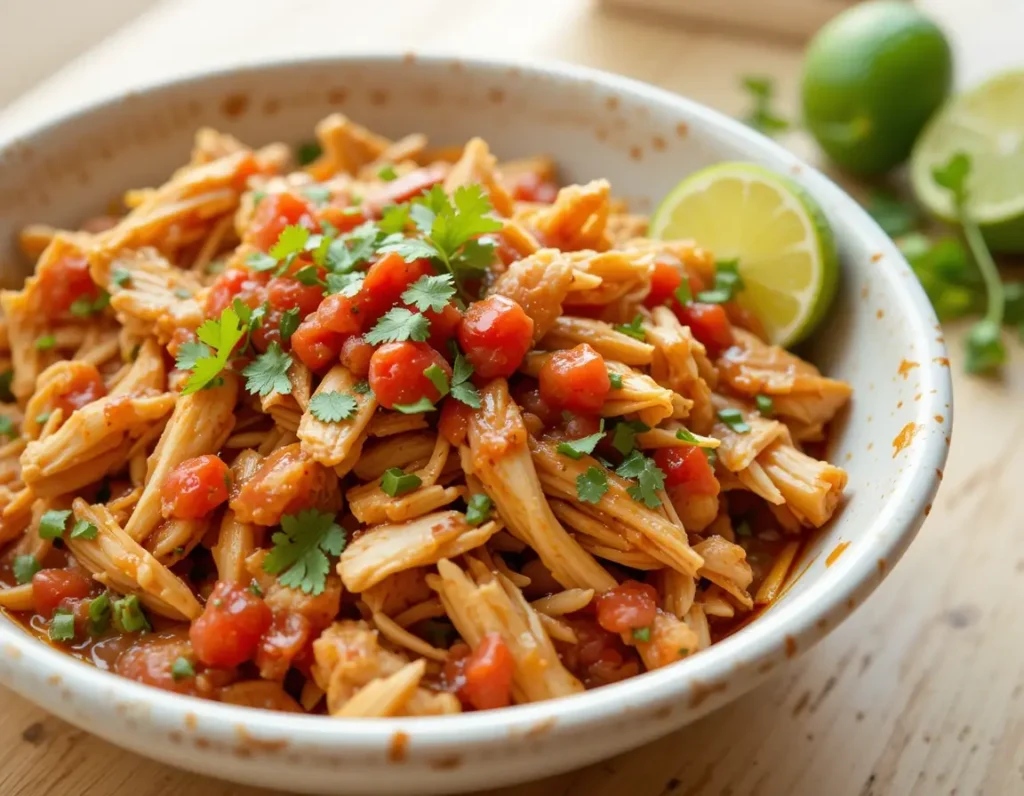
4. Slow Cooker Salsa Chicken
The day I discovered this recipe, I stopped feeling guilty about not being a “from-scratch” person every single night. During a particularly hellish work week—the kind where you’re sending emails at stoplights—I tossed chicken, salsa, and a few other things into my slow cooker before rushing out the door.
Eight hours later, I walked into a house that smelled like a Mexican restaurant had moved in. The chicken shredded with barely a touch of the fork, and it tasted like I’d spent hours cooking instead of 5 frantic morning minutes. This has become my secret weapon—the recipe that makes people think I have my life together even when I’m hanging by a thread.
Ingredients You’ll Need
- 2 lbs boneless, skinless chicken breasts
- 1 (16 oz) jar salsa (mild, medium, or hot—your call)
- 1 packet taco seasoning (or 2 tablespoons homemade)
- 1 (15 oz) can black beans, drained and rinsed
- 1 (15 oz) can corn, drained
- 1 (4 oz) can diced green chilies
- 1/2 cup chicken broth
- Optional toppings: shredded cheese, sour cream, avocado, cilantro, lime wedges
Ava’s swaps: Chicken thighs are more tender here. Pinto beans work great instead of black beans, and fresh or frozen corn beats canned.
Timing
- Prep: 5 minutes
- Cook: 4 hours on high or 7-8 hours on low
- Total: 4-8 hours (mostly hands-off)
How to Make It
Step 1: Dump and go
Place chicken breasts in your slow cooker. Sprinkle with taco seasoning. Pour salsa, chicken broth, black beans, corn, and green chilies over the chicken. That’s it. Seriously.
Step 2: Walk away
Cover and cook on high for 4 hours or low for 7-8 hours. The beauty of slow cooking is the flexibility—both settings yield equally delicious results.
Step 3: Shred and let it soak
Use two forks to shred the chicken directly in the slow cooker. Stir well to combine with all the sauce. Let it sit for an additional 10 minutes to absorb those flavors before serving.
Nutritional Info
Per serving: 330 calories | 40g protein | 28g carbs | 5g fat | 8g fiber
How I Serve It
This is incredibly versatile. Create burrito bowls with rice and toppings, use as taco or burrito filling, or serve over lettuce for a taco salad. The leftovers actually taste better the next day as the flavors continue to develop.
What Not to Do
Stop opening the lid to “check on it.” Every peek extends cooking time by about 20 minutes. Trust the process.
Always thaw chicken completely before slow cooking—frozen chicken is a food safety risk in slow cookers.
And season your chicken before it goes in. Despite all the flavorful ingredients, unseasoned chicken still tastes bland.
Storage Tips
This freezes exceptionally well for up to 3 months. Portion into meal-sized containers for quick future dinners. In the fridge, it keeps for 5 days. The flavors improve after a day, making this perfect for meal prep.
5. Air Fryer Parmesan Chicken Tenders
The great chicken nugget battle in my house ended the day I perfected these tenders. After years of serving frozen dinosaur-shaped versions, I wondered if real chicken would ever be accepted. This recipe was my last stand—and it worked.
The air fryer transforms these hand-breaded tenders into crispy perfection with a fraction of the oil. When my pickiest eater said, “These are better than restaurant ones, Mom,” I nearly fell over.

Ingredients You’ll Need
- 1 lb chicken tenderloins (or chicken breast cut into strips)
- 1/2 cup all-purpose flour
- 2 eggs, beaten
- 1 cup panko breadcrumbs
- 1/2 cup grated Parmesan cheese
- 1 teaspoon Italian seasoning
- 1/2 teaspoon garlic powder
- 1/2 teaspoon onion powder
- Salt and pepper to taste
- Olive oil spray
Ava’s swaps: Gluten-free flour and breadcrumbs work perfectly for dietary restrictions.
Timing
- Prep: 10 minutes
- Cook: 12 minutes
- Total: 22 minutes
How to Make It
Step 1: Set up your breading station
Three shallow dishes: flour seasoned with salt and pepper, beaten eggs, and panko mixed with Parmesan, Italian seasoning, garlic powder, and onion powder.
Step 2: Bread the chicken
Dredge each tender in flour, shaking off excess. Dip in egg, then coat thoroughly in breadcrumb mixture, pressing gently to make it stick.
Step 3: Air fry to golden perfection
Preheat air fryer to 390°F. Spray the basket with olive oil. Place tenders in a single layer (work in batches if needed). Spray the tops lightly. Cook 6 minutes, flip, spray again, and cook another 6 minutes until golden and cooked through (165°F).
Nutritional Info
Per serving: 280 calories | 32g protein | 16g carbs | 10g fat | 1g fiber
How I Serve It
These are versatile enough for kids and adults. Serve with roasted vegetables or a fresh salad. Perfect for dipping in marinara, honey mustard, or ranch. Slice them for Caesar salad or wrap in tortillas with lettuce and tomato for quick lunch.
What Not to Do
Don’t overcrowd the air fryer. Proper air circulation is crucial for crispiness.
Preheat your air fryer—this is essential for that perfect crispy exterior.
Don’t skip the oil spray. A light coating makes all the difference in browning.
Storage Tips
Best fresh, but leftovers keep 3 days in the fridge. Reheat in the air fryer at 370°F for 3-4 minutes to restore crispiness. Don’t microwave—it makes the breading soggy. These freeze well too—freeze individually on a baking sheet first, then transfer to a freezer bag for up to 2 months.
6. Mediterranean Chicken Quinoa Bowl
This was born from lunch envy. After watching a coworker bring gorgeous grain bowls to work while I microwaved sad leftovers, I decided to crack the code on bowls that wouldn’t cost me $15 from the trendy place down the street.
What started as a money-saving experiment became a revelation. The combination of nutty quinoa, seasoned chicken, and Mediterranean staples creates perfect balance. I now prep components on Sunday evenings, and assembly takes less than 30 seconds each morning. It’s my insurance policy against the 2 PM vending machine visit.
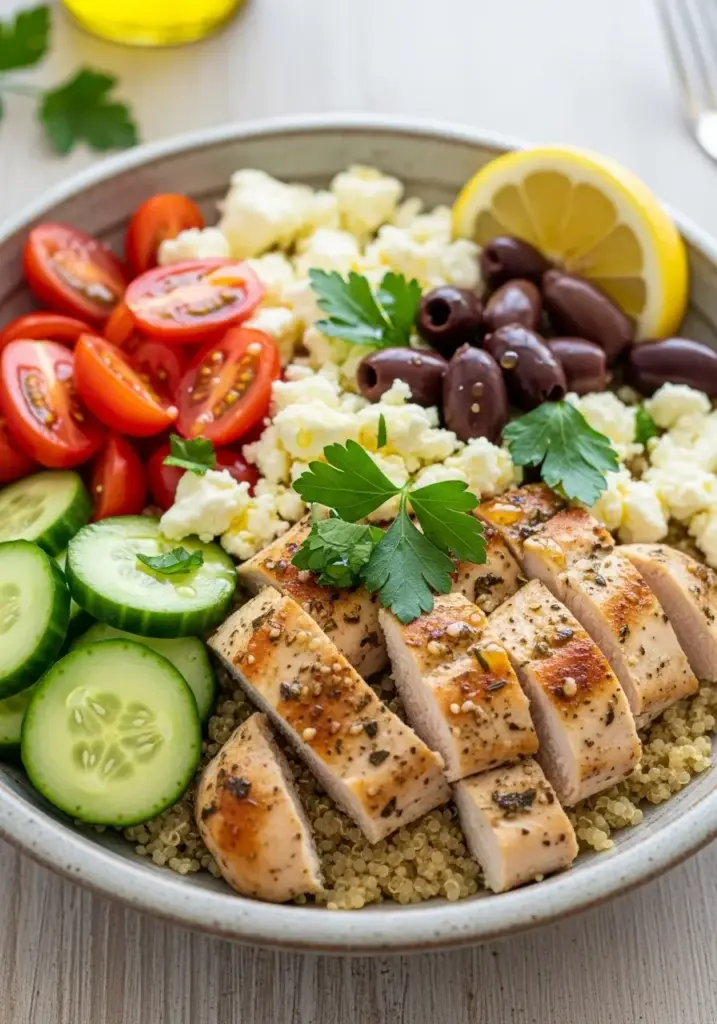
Ingredients You’ll Need
- 1 lb boneless, skinless chicken breasts, cubed
- 2 tablespoons olive oil, divided
- 1 tablespoon Mediterranean seasoning (or oregano, basil, and thyme)
- 1 cup quinoa, rinsed
- 2 cups chicken broth
- 1 cucumber, diced
- 1 cup cherry tomatoes, halved
- 1/2 red onion, thinly sliced
- 1/2 cup Kalamata olives, pitted and halved
- 1/2 cup crumbled feta cheese
For the dressing:
- 3 tablespoons olive oil
- 2 tablespoons lemon juice
- 1 clove garlic, minced
- 1 teaspoon honey
- Salt and pepper to taste
Ava’s swaps: Brown rice or couscous replace quinoa easily. Any protein works—even tofu.
Timing
- Prep: 15 minutes
- Cook: 25 minutes
- Total: 40 minutes
How to Make It
Step 1: Cook the quinoa
Rinse quinoa thoroughly—this removes the bitter coating. Combine quinoa and chicken broth in a saucepan. Bring to a boil, reduce heat to low, cover, and simmer 15 minutes. Remove from heat and let stand covered for 5 minutes, then fluff with a fork.
Step 2: Cook the chicken
While quinoa cooks, heat 1 tablespoon olive oil in a skillet over medium-high heat. Season chicken with Mediterranean seasoning, salt, and pepper. Cook 6-8 minutes, stirring occasionally, until browned and cooked through.
Step 3: Make the dressing
Whisk together olive oil, lemon juice, garlic, honey, salt, and pepper until emulsified.
Step 4: Build your bowls
Divide quinoa among four bowls. Top with chicken, cucumber, tomatoes, onion, olives, and feta. Drizzle with dressing just before serving.
Nutritional Info
Per serving: 420 calories | 30g protein | 35g carbs | 18g fat | 5g fiber
How I Serve It
These are complete meals but can be customized endlessly. Add hummus or tzatziki for extra Mediterranean flair. Warm pita bread on the side is always welcome. These work equally well warm or cold, making them perfect for meal prep or picnics.
What Not to Do
Rinse your quinoa. This step removes the bitter saponin coating—skip it and you’ll wonder why your quinoa tastes off.
Don’t overcook those chicken cubes. Small pieces cook quickly, and overcooked chicken is dry chicken.
Cook quinoa in broth, not water, for significantly better flavor. This simple swap makes a huge difference.
Add dressing right before serving to keep vegetables fresh and crisp.
Storage Tips
Ideal for meal prep—prepare all components separately and store up to 4 days. Keep dressing separate until serving. Store vegetables separately from quinoa and chicken to maintain crispness. Easily assembled in the morning for lunch or quickly put together for no-fuss dinner.
7. Instant Pot Butter Chicken
My relationship with Indian takeout was getting expensive. The week I spent $64 on butter chicken for two, I knew something had to change. Enter this Instant Pot version that transformed my dinner game.
The first time I made it, Jamie looked genuinely confused—he couldn’t believe it came from our kitchen. The pressure cooker infuses the chicken with complex spices in a fraction of the time, creating authentic depth of flavor that usually requires hours. This has become our Friday night tradition—a ritual that feels special but requires less effort than ordering delivery.
I’ve since made this for dinner guests who’ve requested the name of “my caterer.” Little do they know it’s just me, my Instant Pot, and 30 minutes.
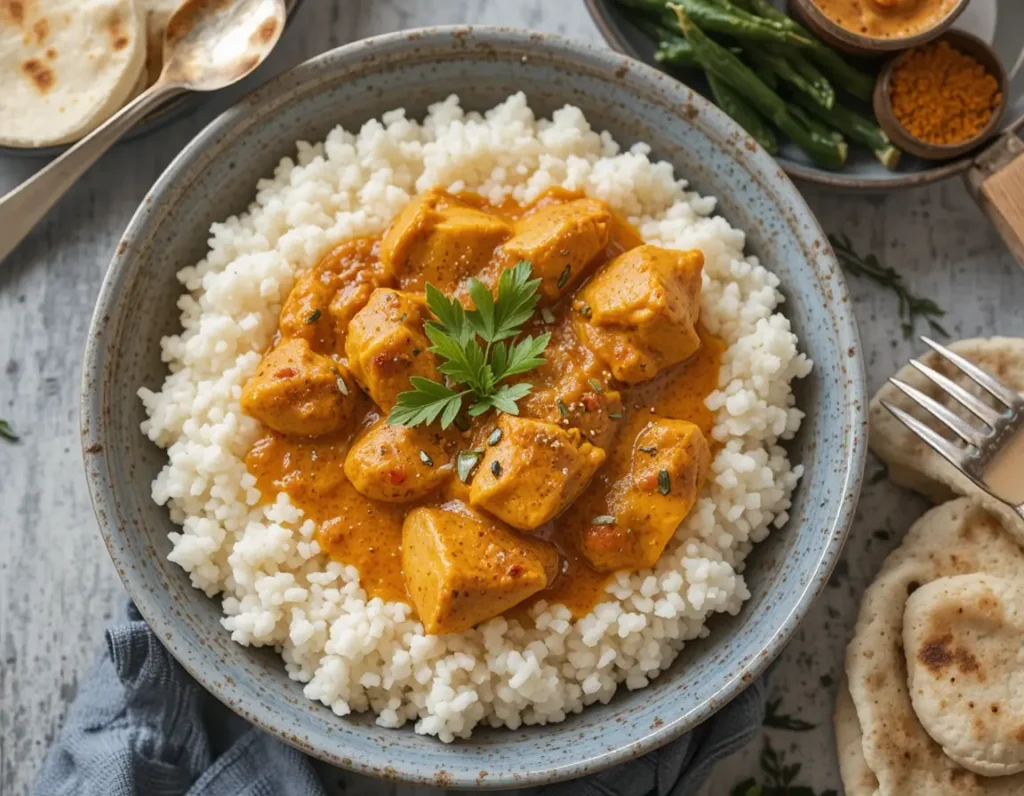
Ingredients You’ll Need
- 2 lbs boneless, skinless chicken thighs, cut into 2-inch pieces
- 2 tablespoons butter
- 1 large onion, diced
- 4 cloves garlic, minced
- 2 tablespoons ginger, grated
- 2 tablespoons garam masala
- 1 tablespoon curry powder
- 1 teaspoon turmeric
- 1 teaspoon cumin
- 1 (6 oz) can tomato paste
- 1 (14 oz) can coconut milk
- 1/2 cup chicken broth
- Salt to taste
- 1/4 cup heavy cream
- 2 tablespoons fresh cilantro, chopped
Ava’s swaps: Chicken breasts work but won’t be as tender. Greek yogurt replaces heavy cream for a tangier version.
Timing
- Prep: 10 minutes
- Cook: 20 minutes (including pressure time)
- Total: 30 minutes
How to Make It
Step 1: Sauté your aromatics
Set Instant Pot to Sauté. Add butter and melt. Add onion and cook 3-4 minutes until softened. Add garlic and ginger, cooking another minute until fragrant.
Step 2: Toast those spices
Add garam masala, curry powder, turmeric, and cumin to the pot, stirring to coat the onions. This crucial step releases essential oils and deepens flavor—don’t skip it. Add chicken and stir to coat.
Step 3: Pressure cook
Add tomato paste, coconut milk, and chicken broth. Stir well, scraping any browned bits from the bottom to prevent the “burn” notice. Close lid, set valve to Sealing, and cook on Manual High Pressure for 10 minutes.
Step 4: Finish it off
After cooking, allow natural pressure release for 5 minutes, then carefully quick release. Set to Sauté again, stir in heavy cream, and simmer 2-3 minutes until sauce thickens. Taste and adjust seasoning.
Nutritional Info
Per serving: 390 calories | 35g protein | 10g carbs | 25g fat | 2g fiber
How I Serve It
Over basmati rice with naan bread for soaking up that velvety sauce. Cauliflower rice works for lower-carb needs. Garnish with fresh cilantro and a drizzle of cream for restaurant-quality presentation. Cucumber raita on the side provides cooling contrast.
What Not to Do
Don’t skip sautéing spices. This step develops deep flavors.
Room temperature ingredients cook more evenly and reduce pressure build-up time.
That 5-minute natural release allows proteins to relax, resulting in tender chicken. Don’t skip it.
Scrape the bottom properly—this is the leading cause of the “burn” notice.
Storage Tips
This improves with time as flavors meld, making it ideal for meal prep. Store in airtight containers up to 4 days in the fridge or 3 months in the freezer. When reheating, add a splash of water or cream if sauce has thickened. If freezing, slightly undercook the chicken initially so it doesn’t overcook when reheated.
Final Thoughts: Making Weeknight Chicken Work
Through years of weeknight cooking battles, I’ve learned that the perfect chicken recipe isn’t about fancy ingredients or chef-level techniques—it’s about reliability. It’s knowing that in 30 minutes or less, you can transform that package of chicken into something that makes your family look up from their phones.
Which one will save your next weeknight? Maybe start with the sheet pan lemon garlic chicken when you need hands-off magic, or try the honey garlic stir-fry when time is impossibly tight. Perhaps the slow cooker salsa chicken will be your Wednesday salvation, or the Instant Pot butter chicken becomes your new “better than takeout” tradition.
These recipes have rescued countless dinners in my tiny Portland kitchen, and I’m hoping they’ll do the same for you. If you love quick, flavorful meals like these, you might also enjoy my One-Pan Garlic Butter Salmon. You’ll find it just as comforting and easy!
Drop a comment below and let me know which recipe becomes your weeknight hero. I’d love to hear about any personal touches you added—your fellow dinner warriors will thank you for the inspiration.
Now if you’ll excuse me, I need to go stop Cilantro from stealing the chicken I just set out to thaw. Some things never change.
FAQs
Can I prepare any of these recipes in advance?
Absolutely! The slow cooker salsa chicken and Instant Pot butter chicken actually taste better the next day as flavors continue to develop. The Mediterranean quinoa bowls can be assembled up to 3 days in advance, keeping the dressing separate until serving. For sheet pan and stir-fry recipes, prep vegetables and make sauces ahead of time to speed up the cooking process.
How can I make these recipes healthier?
Each recipe includes healthier substitution options. Generally, you can reduce sodium by using low-sodium broths and sauces, decrease fat by using cooking spray instead of oil where possible, and increase fiber by adding extra vegetables. Greek yogurt makes an excellent substitute for heavy cream in creamy recipes.
What’s the best way to ensure chicken is cooked properly?
The only reliable method is using a meat thermometer. Chicken should reach an internal temperature of 165°F (74°C) at its thickest point. Color is not a reliable indicator of doneness, particularly with chicken thighs which can remain slightly pink even when fully cooked.
Can these recipes be doubled for larger families or meal prep?
Most recipes double easily, though you may need to cook in batches for skillet and air fryer methods. For sheet pan recipes, use two pans rather than overcrowding one. Slow cooker and Instant Pot recipes can be doubled if your appliance is large enough (usually 6 quarts or larger).
Which recipe is best for picky eaters?
The air fryer Parmesan chicken tenders and sheet pan lemon garlic chicken tend to be crowd-pleasers even with selective eaters. For very picky eaters, consider serving components separately—plain chicken alongside vegetables and a dipping sauce on the side often works well.
Are these recipes suitable for special diets?
Many of these recipes can be adapted for special diets. The honey garlic stir-fry and Mediterranean quinoa bowl can be made gluten-free with simple substitutions. The creamy Tuscan chicken and butter chicken work well for low-carb or keto diets when served without rice. For dairy-free options, coconut milk or dairy-free alternatives can replace cream and cheese in most recipes.
How do I store leftovers safely?
Always cool food to room temperature before refrigerating (but don’t leave it out longer than 2 hours). Store in airtight containers and consume within 3-4 days. When reheating, ensure the chicken reaches 165°F throughout to eliminate any potential bacteria. For freezing, store in freezer-safe containers or heavy-duty freezer bags with as much air removed as possible to prevent freezer burn.