You know that moment when you’re craving something warm, cheesy, and completely indulgent but don’t want to spend hours in the kitchen? That’s exactly how these cheesy garlic butter rollups were born in my tiny Portland kitchen on a particularly drizzly Tuesday evening.
I was meal prepping for the week when Jamie walked in, took one whiff of my garlic-infused kitchen, and declared it “unfair to tease someone like that.” Honestly, I’ve messed this up more times than I care to admit, but once I figured out the perfect balance of buttery goodness and melty cheese, these became our go-to comfort snack.
The Story Behind My Garlic Butter Obsession
Trust me on this one – my love affair with garlic butter started during my Southeast Asia trip, but it really took off when I moved in with Jamie. You see, being gluten-free means finding creative ways to satisfy those carb cravings, and these rollups have become our weekend movie-night essential.
The first time I attempted these, I definitely went overboard with the garlic powder (shocking, I know). My kitchen smelled absolutely incredible, but the flavor was so intense that even Cilantro, my orange tabby who usually begs for everything, turned his nose up at them. That taught me the hard way that even garlic lovers need balance.
What Makes These Rollups Special
Don’t worry if you’re not a baking expert – mine always looks messy too, and that’s half the charm! These cheesy garlic butter rollups are basically foolproof comfort food that comes together in under 25 minutes. Here’s why they work so perfectly:
The Magic Trio: Butter, Garlic, and Cheese
I learned this trick from watching my Abuela Rosa work magic with simple ingredients. She always said the secret to great food isn’t fancy techniques – it’s using quality ingredients and not being afraid to taste as you go.
For these rollups, I use:
- Real butter (never margarine – life’s too short)
- Fresh garlic mixed with a touch of garlic powder (controversial but honest – I double up because flavor matters)
- A blend of mozzarella and sharp cheddar for that perfect melt-and-tang combination
The 25-Minute Timeline That Actually Works
Your kitchen will smell absolutely incredible within the first 10 minutes, but here’s the breakdown that works every single time:
- 5 minutes: Prep and roll
- 15 minutes: Bake to golden perfection
- 5 minutes: Cool just enough so you don’t burn your tongue (learned that one the hard way too)
My Go-To Recipe for Cheesy Garlic Butter Rollups
Ingredients:
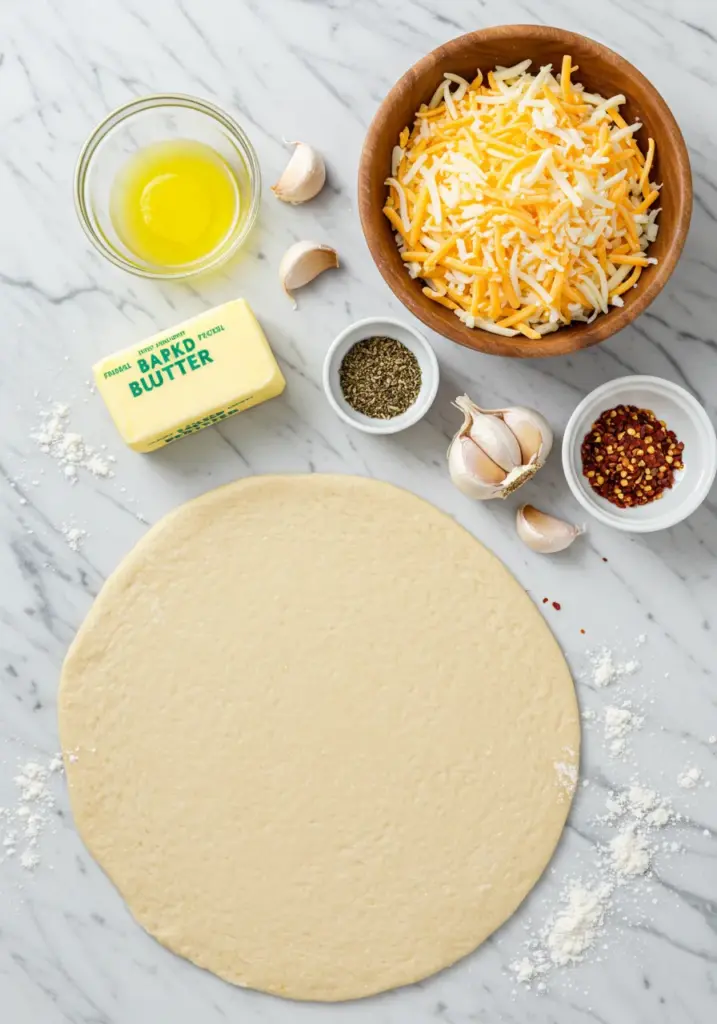
🧄 Gather Your Ingredients
Check off each item as you collect them for your cheesy garlic butter rollups!
“Trust me on this one – having everything ready makes the magic happen so much faster!” – Ava
- 1 tube refrigerated pizza dough (gluten-free works perfectly)
- 4 tablespoons butter, melted
- 3 cloves garlic, minced (plus 1/2 teaspoon garlic powder)
- 1 1/2 cups shredded cheese (mozzarella and cheddar blend)
- 1 teaspoon dried Italian herbs
- Pinch of red pepper flakes (optional, but I always add them!)
- Fresh parsley for garnish
Instructions:
Step 1: Prep Your Canvas Preheat your oven to 375°F. Roll out that pizza dough on a floured surface – don’t stress about making it perfectly rectangular. Mine never is, and they still turn out amazing.
Step 2: Create the Garlic Butter Magic Mix your melted butter with minced garlic, garlic powder, and Italian herbs. This is where your kitchen starts smelling like pure comfort food heaven.
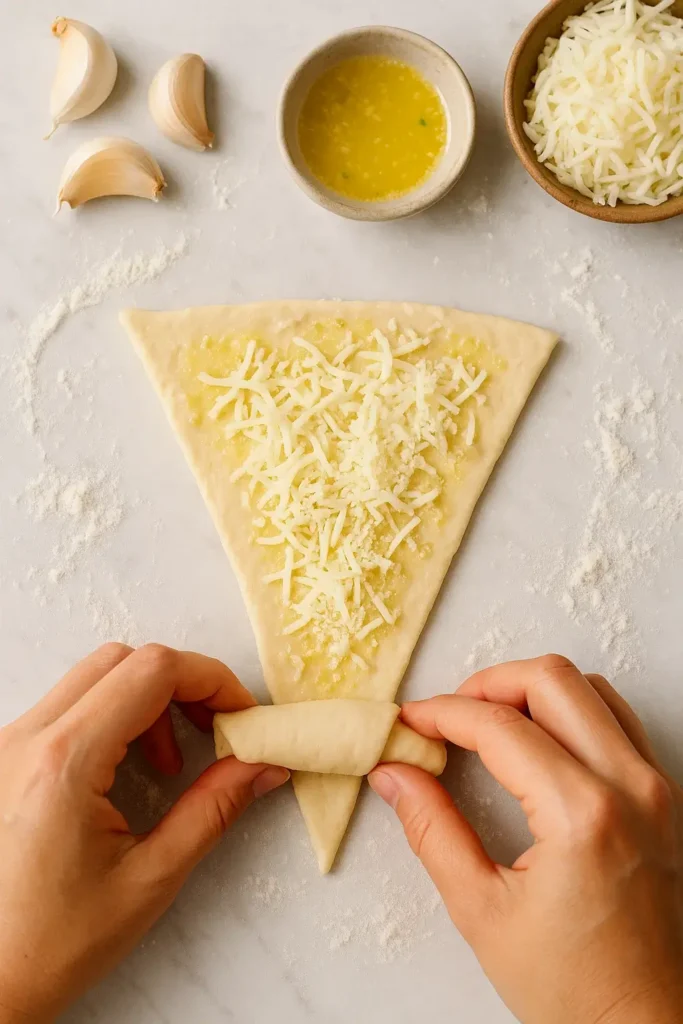
Step 3: Assembly Time Brush half the garlic butter mixture over the dough, leaving about an inch border. Sprinkle that beautiful cheese blend evenly – I always add a little extra because, honestly, is there such a thing as too much cheese?
Step 4: Roll and Slice Starting from the long side, roll the dough tightly (but not so tight it tears). Using a sharp knife, cut into 12 pieces. Place them cut-side up on a parchment-lined baking sheet.
Step 5: The Final Touch Brush the tops with remaining garlic butter mixture. This is what gives you that gorgeous golden color and extra flavor punch.
Step 6: Bake to Perfection Bake for 12-15 minutes until golden brown and the cheese is bubbling. The smell alone will have everyone gathering in the kitchen.
Pro Tips from My Kitchen Disasters
After burning my fair share of these beauties, here’s what I’ve learned:
Spacing Matters: Give each rollup room to expand – they puff up more than you’d expect.
Temperature Check: If your oven runs hot like mine, start checking at 12 minutes. Nobody wants garlic-flavored charcoal.
The Cheese Situation: Pre-shredded cheese works fine, but freshly grated melts so much better. I usually compromise and do half and half when I’m feeling lazy.
Serving Suggestions That Actually Make Sense
These cheesy garlic butter rollups are perfect for:
- Game day snacks (they disappear faster than you can make them)
- After-school hunger emergencies
- Weekend breakfast with scrambled eggs – try my baked cottage cheese eggs as a protein-packed side
- Soup dippers – they’re incredible with tomato soup or any of my hearty dump-and-go slow cooker recipes
I love serving them warm with a side of marinara for dipping, but honestly, they’re perfect just as they are. Jamie always jokes that the first batch never makes it to the table because we end up eating them straight from the pan.
If you’re feeling fancy, try sprinkling some fresh parsley on top – it adds a nice color contrast and makes you look like you totally planned this level of deliciousness.
Storage and Reheating (If There Are Leftovers)
Let’s be real – leftovers are rare with these, but if you somehow manage to save a few:
Store covered in the fridge for up to 3 days. Reheat in a 350°F oven for 5-7 minutes to get that crispy exterior back. The microwave works in a pinch, but you’ll lose that beautiful texture.

Why These Beat Store-Bought Every Time
Making your own cheesy garlic butter rollups means controlling every ingredient. No weird preservatives, no mystery chemicals – just real butter, real cheese, and enough garlic to make your kitchen smell like pure comfort.
Plus, there’s something incredibly satisfying about pulling these golden beauties from your own oven. It’s like giving yourself and your family a warm, cheesy hug.
If you love these as much as we do, you might also enjoy my [Easy Cheesy Breadsticks with Herb Butter]. They use similar flavors but with a completely different texture that’s equally addictive!
These cheesy garlic butter rollups have become such a staple in our house that I actually keep the ingredients on hand for emergency comfort food situations. Trust me, once you make these, you’ll understand why Jamie now refers to Tuesday evenings as “rollup night.”
What’s your favorite comfort food that takes less than 30 minutes? I’m always looking for new quick fixes for those cozy-food cravings!

Cheesy Garlic Butter Rollups
Ingredients
Method
- Prep Your Oven: Preheat oven to 375°F (190°C). Line a baking sheet with parchment paper.
- Prepare Garlic Butter: In a small bowl, mix melted butter with minced garlic, garlic powder, and Italian herbs. Set aside.
- Roll the Dough: On a floured surface, roll out pizza dough into a rectangle (don’t worry about perfection!).
- Add Filling: Brush half the garlic butter mixture over the dough, leaving a 1-inch border. Sprinkle cheese blend evenly over the surface.
- Roll and Slice: Starting from the long side, tightly roll the dough. Using a sharp knife, cut into 12 equal pieces.
- Arrange and Brush: Place rollups cut-side up on prepared baking sheet. Brush tops with remaining garlic butter mixture.
- Bake: Bake for 12-15 minutes until golden brown and cheese is bubbly.
- Serve: Let cool for 5 minutes, garnish with fresh parsley, and serve warm.
Notes
Reheating: Reheat in 350°F oven for 5-7 minutes to restore crispiness
Substitutions: Use any pizza dough brand; gluten-free works great
Pro Tip: Don’t skip the garlic powder – it adds extra depth to the fresh garlic Nutrition Information (per rollup):
Calories: 145
Fat: 8g
Carbohydrates: 14g
Protein: 6g
Sodium: 285mg
FAQs
Can I make these Cheesy Garlic Butter Rollups ahead of time?
Yes! You can prepare them up to 24 hours in advance and refrigerate before baking. Add an extra 2-3 minutes to the baking time if cooking from cold.
Can I freeze these rollups?
Absolutely. Freeze them unbaked on a baking sheet until solid, then transfer to a freezer bag for up to 1 month. Bake from frozen, adding 5-7 minutes to the cooking time.
What’s the best cheese substitute for a lactose-free version?
Plant-based mozzarella and parmesan alternatives work well in this recipe. Look for brands that specify good melting properties for best results.
Can I use homemade dough instead of refrigerated crescent rolls?
Yes, a basic pizza dough or homemade biscuit dough can work wonderfully. Roll it thin before cutting into triangles.
How can I make these Cheesy Garlic Butter Rollups spicier?
Increase the red pepper flakes to 1 teaspoon or add a dash of cayenne pepper to the butter mixture. You could also include finely diced jalapeños in the cheese filling.
Are these suitable for vegetarians?
Yes, this recipe is vegetarian-friendly as written. Just ensure your parmesan is made with vegetable rennet if serving strict vegetarians.
You May Also Like